When it comes to tackling home renovation and painting jobs, choosing the right sprayer can make all the difference in efficiency, finish quality, and overall satisfaction with the project. Whether you’re refreshing a room, painting exterior siding, or applying stain to a deck, the right paint sprayer can save you time and deliver professional results. One option that often rises to the top in discussions among both DIY homeowners and professional painters is the paint spraying kit — known for its durability, performance, and adaptability across various painting tasks.
Why Choosing the Right Paint Sprayer Matters
Home renovation and painting jobs vary widely in scope — from small interior walls to large exterior surfaces. Traditional methods like brushes and rollers are time-tested, but they can be slow and often result in visible brush marks or uneven coverage. Paint sprayers, on the other hand, allow for:
Faster application: Cover large surfaces quickly.
Even finish: Produce a smooth look without brush strokes.
Versatility: Apply paint, stain, sealers, and more on various surfaces.
Access to tight spots: Reach corners and textured surfaces more easily.
However, not all sprayers are created equal. They differ in power source, nozzle type, capacity, portability, and pressure output. Understanding these differences ensures that you end up with a sprayer that fits your project needs rather than one that hampers your progress.
Main Types of Paint Sprayers
Before diving into top models, it’s essential to understand the main types of paint sprayers available for home renovation projects.
1. Airless Paint Sprayers
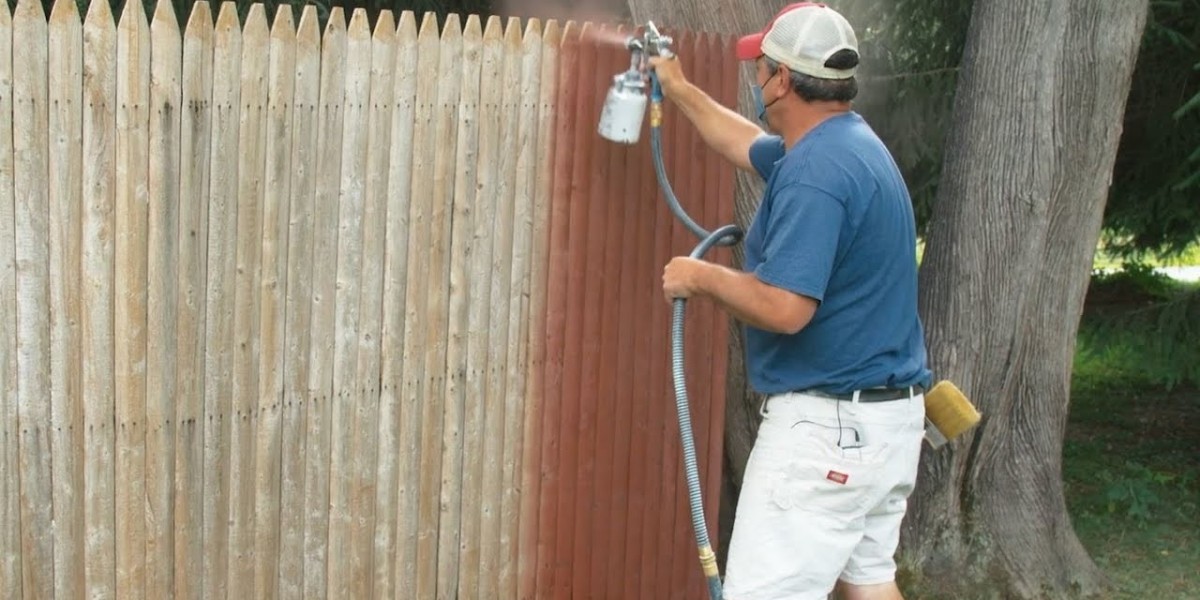
Airless sprayers push paint through a nozzle at high pressure without using compressed air. This results in a smoother finish and faster application, especially on large, flat surfaces.
Best for: Exterior walls, fences, decks, large interior rooms.
Pros:
Quick coverage
Smooth, professional finish
Handles thick paints
Cons:
Requires cleaning after use
Might overspray in small areas
2. HVLP (High Volume Low Pressure) Sprayers
HVLP sprayers use a turbine to push paint at low pressure. They deliver fine atomization, which makes them ideal for detailed work and thinner materials.
Best for: Cabinets, furniture, trim, crafts.
Pros:
Precision application
Less overspray
Great for detailed projects
Cons:
Slower coverage
Not ideal for thick paints
3. Compressed Air Sprayers
These traditional sprayers use compressed air to apply paint. While once common, they have largely been overshadowed by airless and HVLP systems due to more overspray and lower efficiency.
Best for: Small projects where cost is a concern.
Pros:
Low upfront cost
Simple mechanism
Cons:
Heavy overspray
Less control
Key Features to Look for in a Sprayer
Choosing the right sprayer involves understanding the features that will impact performance, ease of use, and end results. Here are the key elements to consider:
Pressure Control
Adjustable pressure allows you to fine-tune the sprayer for different coatings. Higher pressure is better for thick paints, while lower pressure works best for thinner materials.
Nozzle Size and Compatibility
Nozzles determine how finely paint is atomized. Larger tips are suited for thicker paints like latex, while smaller tips are ideal for thin coatings like stains or lacquers.
Hose Length and Flexibility
A longer hose increases reach without moving the machine, which is useful when painting exteriors or ceilings. Flexible hoses reduce fatigue.
Portability
Electric models are typically lighter and easier for indoor tasks. Gas-powered sprayers are heavier but offer more power for large outdoor projects.
Ease of Cleaning
Paint sprayers must be cleaned thoroughly after each use to prevent clogging. Models with quick release parts and easily accessible components save time and frustration.
Durability
Construction quality matters — stainless steel parts, robust pumps, and reliable seals extend a sprayer’s effective lifespan.
Top Sprayers for Home Renovation and Painting Jobs
With the fundamentals in mind, let’s explore some of the best sprayers for a variety of common home renovation scenarios.
1. Best Overall for Versatility: Airless Sprayers
Airless sprayers are the workhorses of renovation projects. They balance speed and finish quality across a wide range of paint types.
Airless Sprayer Highlights
High-output pressure systems
Suitable for interior and exterior walls
Efficient for large surfaces
Recommended Uses:
Interior walls, exterior siding, decks, fences.
Advantages:
Quick coverage
Suitable for latex and enamel paints
Professional-grade finish
Considerations:
Heavier than HVLP sprayers
Requires careful masking to prevent overspray
2. Best for Interior Detail Work: HVLP Sprayers
When your focus is cabinets, trim, furniture or other detailed interior surfaces, an HVLP sprayer offers precision and control.
HVLP Sprayer Highlights
Low overspray for precise application
Ideal for thin coatings such as stains, lacquers, and sealers
Recommended Uses:
Cabinet refinishing, furniture, trim, crafts.
Advantages:
Excellent control
Clean finish
Great for small projects
Considerations:
Slower than airless models
Not suitable for thick paints without thinning
3. Best for Small DIY Projects: Handheld Sprayers
Portable and budget-friendly, handheld sprayers are perfect for quick touch-ups and small spaces.
Handheld Sprayer Highlights
Compact design
Easy to use
Good for stains and light paints
Recommended Uses:
Touch-ups, small rooms, furniture.
Advantages:
Affordable
Simple operation
Considerations:
Limited capacity
Not ideal for large surfaces
How to Choose the Right Sprayer for Your Project
Selecting the right sprayer depends heavily on the type of work you’ll be doing.
Assess the Surface Area
Large areas? Choose an airless sprayer for speed and coverage.
Detailed work? HVLP offers precision and control.
Small touch-ups? Look into handheld sprayers.
Consider Paint Type
Thick latex paint: Needs high pressure — airless is best.
Stain or varnish: HVLP offers finer control with minimal waste.
Evaluate Your Skill Level
Some sprayers have steeper learning curves. HVLP models require patience and practice for even coats, while airless sprayers demand attention to masking to prevent overspray.
Budget Wisely
Higher-end models offer durability and better performance but cost more upfront. If this is a one-off project, a mid-range model might suffice.
Step-by-Step Guide to Using a Paint Sprayer
Getting great results from your sprayer involves more than just buying the right model. Here’s a step-by-step guide to using it effectively.
1. Prepare the Surface
Clean, sand, and mask off areas you don’t want painted. Cover furniture and floors with drop cloths or plastic sheeting.
2. Thin the Paint if Necessary
Consult the sprayer manual. Some paints need to be thinned to flow through the nozzle properly.
3. Test on Scrap Material
Before starting your main surface, practice on cardboard or scrap wood to adjust pressure and technique.
4. Maintain Proper Distance and Speed
Hold the sprayer 6–12 inches away from the surface. Move steadily to avoid drips and uneven coverage.
5. Overlap Each Pass
Overlap each pass by about 50% to ensure even coverage and no missed spots.
6. Clean Immediately After Use
Flush the system with water or appropriate solvent to prevent clogs and extend the life of the sprayer.
Maintenance Tips to Extend Your Sprayer’s Life
Taking good care of your paint sprayer ensures it will be ready for future jobs.
Clean Thoroughly After Every Job
Paint residue is the enemy of sprayers. Follow manufacturer instructions for cleaning every component that contacts paint.
Inspect Seals and Nozzles Regularly
Wear and tear on seals can lead to leaks and pressure issues. Replace worn parts promptly.
Store Properly
Keep your sprayer in a dry, safe place. Avoid freezing temperatures, which can damage internal components.
Use Manufacturer-Approved Parts
Using genuine or high-quality replacement parts preserves performance and prevents damage.
Safety Considerations When Using a Sprayer
Safety should never be overlooked, especially when working with paint and power tools.
Wear Protective Gear
Use goggles, gloves, and a respirator or mask to avoid inhaling paint mist.
Ensure Adequate Ventilation
When working indoors, open windows and use fans to disperse fumes.
Keep Away from Flames
Paint mist can be flammable. Avoid open flames and sparks during spraying.
Use Drop Cloths and Masking
Protect floors, windows, and fixtures from overspray.
Final Thoughts
Choosing the right sprayer for your home renovation and painting jobs can elevate your project from a chore to a satisfying accomplishment. By understanding the strengths of different sprayer types — whether the efficient coverage of an airless system, the precision of an HVLP setup, or the convenience of a handheld unit — you can match your tool to your task with confidence.
Remember that the best results come not just from the sprayer itself, but from preparing surfaces correctly, using the right paint and nozzles, practicing your technique, and caring for your equipment after every use. With the right sprayer at your side, your renovation and painting projects will look professional and stand the test of time.